PostgreSQL in Java
What is PostgreSQL?
PostgreSQL is a free and open-source ORDBMS which is known for its extensibility and SQL compliance. It is recommended, for storing a high volume of data, thus used in major web development projects, which can produce a large amount of user-generated data.
Features of PostgreSQL
- Stores high volume of Data efficiently.
- Supports Composite Datatypes.
- Supports GeoSpatial Database.
- Supports Type Inheritance like Table Inheritance, View Inheritance, etc.
- High conformance with SQL standard.
Installing PostgreSQL
Installing PostgreSQL 12 in Windows
Download GUI setup from the official website

After clicking on Download the Installer, you’ll get the list of different setups. From the list, Select Windows x86-64 for row 12.X

After completion of Download, open the Setup file, and you’ll get the following screen, click on the Next button.

- Choose Destination Directory

- Select Components
- PostgreSQL Server(Compulsory): This is the core component of the PostgreSQL.
- pgAdmin4: This provides GUI to interact with PostgreSQL Server.
- Stack Builder: This is a GUI utility to install additional modules for PostgreSQL.
- Command Line Tools(Compulsory): This provides the CLI to interact with PostgreSQL Server.

- Select Directory for storing data. This folder will have all the Data that the user will store in PostgreSQL.

- Enter the password for the Root User: postgres. Do enter it carefully, because this is the root password.

- Configure the Port on which you want to run the PostgreSQL Server. (Default =
5432). Do not change if you are a beginner.

- Set your Locale. Locale is a parameter that defines the user’s region and hence affects the language of the User interface. Here, the most visible change it will cause is the change in the default date-time format.

- Installation Summary

Wait for the process to complete.
Setup Complete

Change the
Pathvariable for the system to make PostgreSQL globally available.- Search for Edit Environment Variables in Start Menu
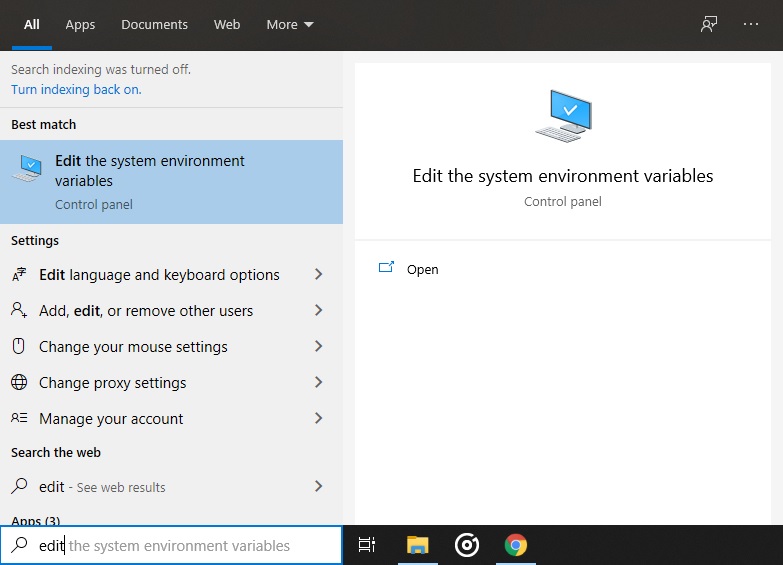
- Select Edit Environment Variables
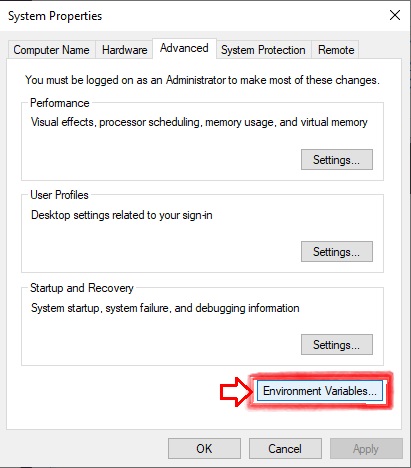
- Edit System’s Path variable
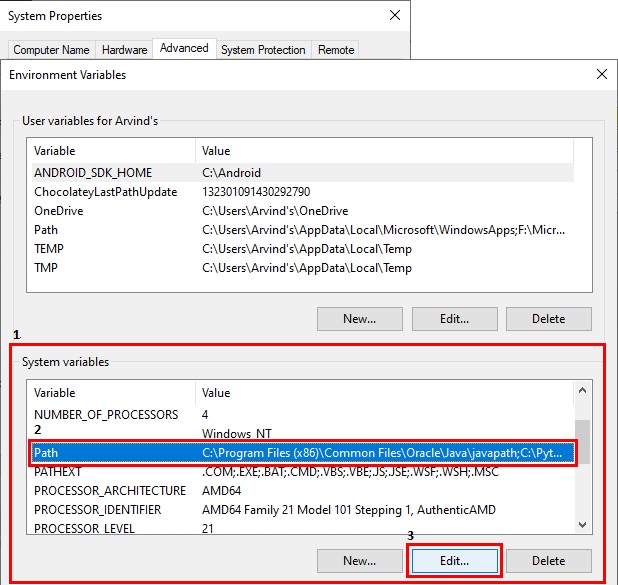
- Add a new variable and pass the path to the
binfolder of the Postgres installation directory.
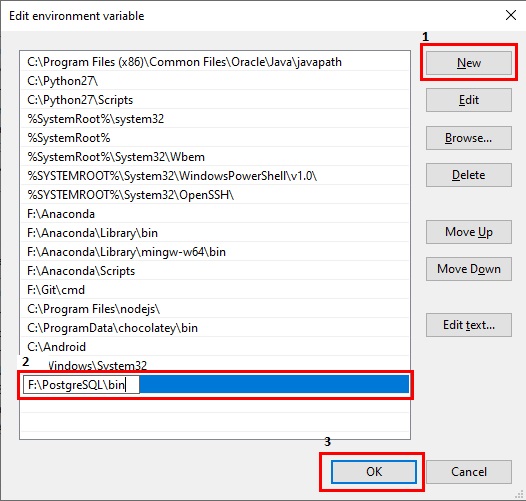
- Click OK on all the opened windows.
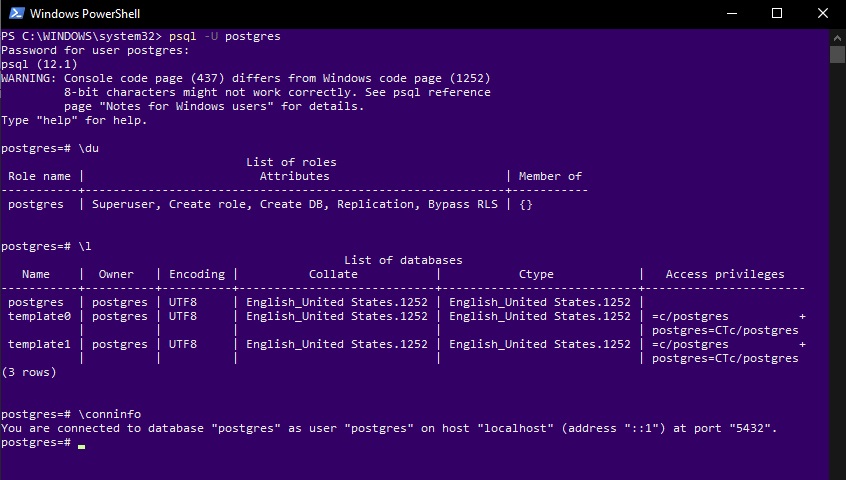
To test the Postgres Installation:
- Enter command
psql -U postgres - Enter your root password, which you entered in “password step” in installation section
- If entered without any error, you will see the new prompt of the Postgres
postgres=# - Enter
\duto list all the available users - Enter
\lto list all the databases - Enter
\conninfoto view connection info
- Enter command
Possible Errors
- Password Authentication Failed: That means the entered password is wrong
psqlnot found: That means the environment variable is not correctly setup.
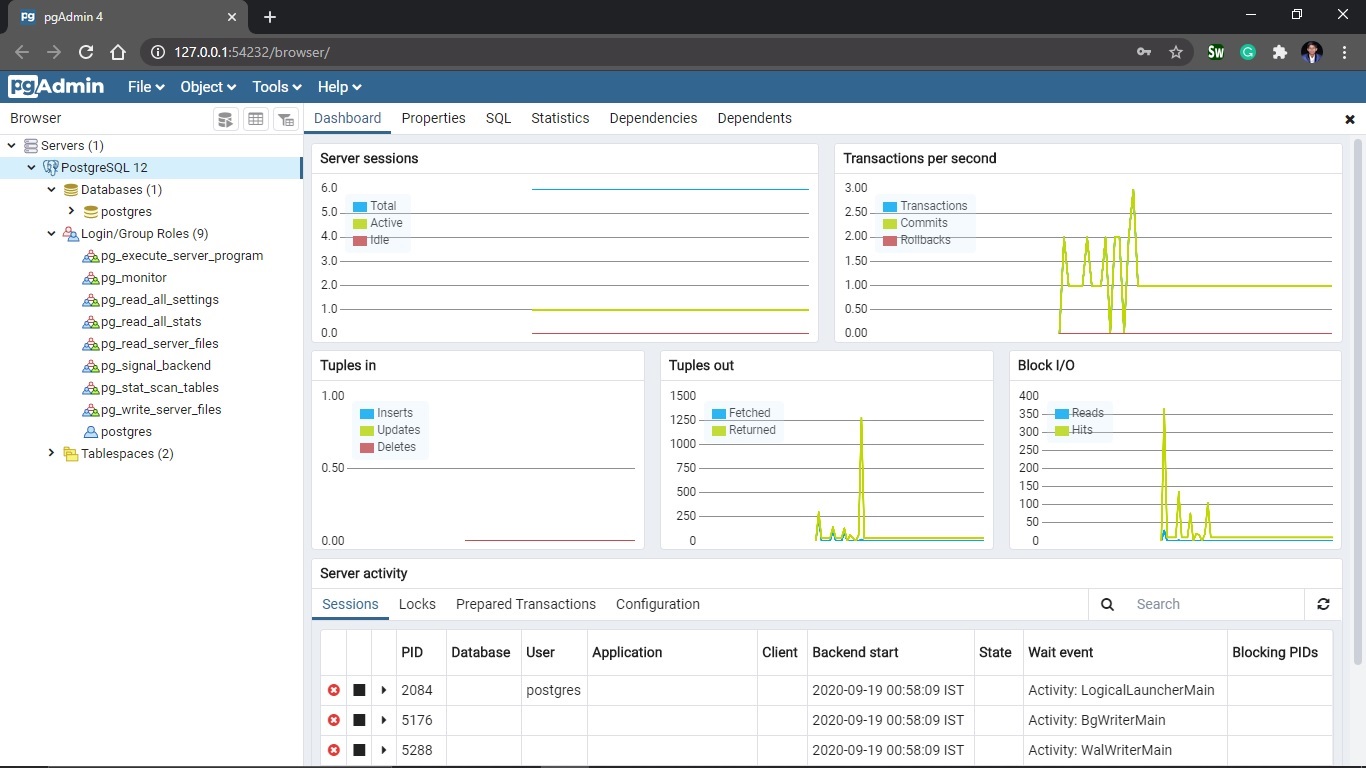
In the above setup, you will also get GUI Software for Database Management called PGAdmin4. You can find the executable in the directory pgadmin/pgadmin4.exe inside the Installation Folder. In the left pane, you can select the server. When selected, it will ask the password for postgres user, you should enter the same password that you set during installation.
The GUI will open in the browser and will look like this.
Installing PostgreSQL in Ubuntu Linux
First update system repositories
sudo apt-get updateInstall PostgreSQL
sudo apt-get install postgresqlWe can also add Contrib packages for additional functionalities
sudo apt-get install postgresql postgresql-contribOpen PostgreSQL
sudo -u postgres psqlTo exit PostgreSQL CUI, use
\qand hitEnter.postgres=# \qTo create a user
sudo -u postgres createuser --i
Enter the name of role to add: my_user
Shall the new role be a superuser? (y/n) y
To create a database
sudo -u postgres createdb my_dbTo connect via the created role
sudo -u my_user psqlTo check Connection Info, after the above command
/conninfoOutput:
You are now connected to database "my_db" as user "my_user" via socket in "<Postgres Installation path>" at port "5432"To locate config files, use
ls etc/postgresql/<version>/main/ls etc/postgresql/12/main/ conf.d pg_ctl.conf pg_ident.conf start.conf environment pg_hba.conf postgresql.conf
To use GUI for PostgreSQL, you can download PGAdmin3 from the Ubuntu Software.
JDBC in Java
Java Database Connectivity (JDBC) is the standard API that enables Java applications to connect with the various databases.
- It provides the methods to connect with the databases and execute queries on them which includes queries to get, add, remove, and modify data in a database.
- JDBC is database-independent and uses vendor-specific drivers to connect with databases.
- JDBC also provides a JDBC-to-ODBC bridge to communicate with databases with ODBC.
For the following content, you are expected to have a basic knowledge of Java and DBMS.
How to use JDBC
To use JDBC, you should have a database with a user which have sufficient privileges on that database. JDBC also needs that user’s name and password to create a connection with the database.
Example
postgres=# CREATE DATABASE my_database;
    CREATE DATABASE
postgres=# CREATE USER temp_user WITH ENCRYPTED PASSWORD 'temp_password';
    CREATE ROLE
postgres=# GRANT ALL PRIVILEGES ON DATABASE my_database to temp_user;
    GRANT
postgres=#
Apart from this, users must also have the PostgreSQL Drivers for JDBC. These drivers can be downloaded from the postgresql website.
Setup project in Netbeans IDE
Netbeans is the official Java IDE and managed by Oracle.
- Download and install Netbeans IDE.
- Create a new Java Project in Netbeans IDE.
- Add downloaded PostgreSQL driver in the Project.
- Right-click on
Projectsand selectProperties. - Click on
Add Libraryand search for the PostgreSQL driver and select it. - If not found, click on
Add JAR/Folderand select downloaded Drivers.
- Right-click on
Setup project in IntelliJ
- Download and install IntelliJ Community Edition.
- Create a Java Command Line Project.
- Add downloaded PostgreSQL driver in the Project.
- After opening the project, click on
Fileand then selectProject Structure. - Go to
LibraryinProject SettingsMenu in Left Pane. - Click on the
+Plus button in Main Pane. - Browse for the Downloaded PostgreSQL Drivers and select the jar file.
- After opening the project, click on
Writing First JDBC program
Prerequisites: A Database and UserName and Password for the user with privileges on the Database.
Code
package com.personal;

import java.sql.Connection;
import java.sql.DriverManager;

public class Main {

    public static void main(String[] args) {
        Connection c = null;
        try {
            Class.forName("org.postgresql.Driver");
            Connection conn = DriverManager.getConnection(
                    "jdbc:postgresql://localhost:5432/my_database", // Connection String
                    "temp_user",                                    // Database User Name
                    "temp_password");                               // Database User Password
            System.out.println("Opened database successfully");
            if (conn.getMetaData().supportsBatchUpdates()) {
                System.out.println("The Database drivers support Batch Updates");
            } else {
                System.out.println("The Database drivers does not support Batch Updates");
            }

        } catch (Exception e) {
            e.printStackTrace();
            System.err.println(e.getClass().getName() + ": " + e.getMessage());
            System.exit(0);
        }
    }
}
Output:
Opened database successfully
The Database drivers support Batch Updates
Explanation
In the above program:
Class.forNameinitializes the PostgreSQL Drivers.- The next line creates the connection object which connects to the Database via the forementioned Drivers.
Here, Connections string is"<DriverClass>://<Database_Host>:<Database_Port>/<Database_Name>" - For a successful connection, a success message will print. Otherwise, the Exception will be thrown.
- After successful creation, we also check whether the driver supports the Batch Updates or not.
This line is used to make use of the connection made in the previous step.
Possible Errors
Password authentication failed for user "<user>"Possible Cause: If user name or password is incorrect.
database "my_database" does not existPossible Cause: If the database
my_databaseis not present.
Creating a new table using JDBC
Code
package com.personal;

import java.sql.Connection;
import java.sql.DriverManager;
import java.sql.SQLException;
import java.sql.Statement;

public class Main {

    public static void createTable(Connection conn) throws SQLException {
        final Statement statement = conn.createStatement();

        String query = "CREATE TABLE post " +
                "(id SERIAL NOT NULL, " +
                "content VARCHAR(255), " +
                "likes INTEGER, " +
                "PRIMARY KEY (id))";

        statement.executeUpdate(query);
    }

    public static void main(String[] args) {
        Connection conn = null;
        try {
            Class.forName("org.postgresql.Driver");
            conn = DriverManager.getConnection("jdbc:postgresql://localhost:5432/my_database","temp_user", "temp_password");

            System.out.println("Creating Table `Post`");
            createTable(conn);
            System.out.println("Created Table `Post`");

        } catch (Exception e) {
            e.printStackTrace();
            System.err.println(e.getClass().getName() + ": " + e.getMessage());
            System.exit(0);
        } finally {
            if (conn != null) {
                try {
                    conn.close();
                } catch (SQLException ex) {
                    ex.printStackTrace();
                }
            }
        }
    }
}
Output:
Creating Table `Post`
Created Table `Post`
Explanation
- The
createTable()method creates a table with columnsid,content, andlikeswhereidis Auto-Generated, Primary key for the table;contentis a string which contains the content of the posts;likesis an integer that will store the total likes given to the post. - In this method, we used the
Statementobject to create a static statement for a database. - Then we used
executeUpdate()to execute the statement. Here,executeStatement()will return0(zero) by default. - This method could throw
SQLExceptionif any database access occurs.
Possible Errors
Relation "post" already exists: Ifposttable is already present in the Database.
Verification
To verify that the table is created, you can do any of the following:
- Run this program again. If the table already exists, a
PSQLExceptionis thrown with the message “Table already exists”. Open
psqlin the terminal with the following command:psql -U temp_user -d my_databaseand then enter the respective password. After this, enter command\dt;, and you will get the following outputmy_database=> \dt; List of relations Schema | Name | Type | Owner --------+------+-------+----------- public | post | table | temp_user (1 row)
Entering a new record in the table
Code
package com.personal;

import java.sql.*;

public class Main {

    public static void addPost(Connection conn, String content, int likes) throws SQLException {

        String query = "INSERT INTO post(content, likes) VALUES (?, ?)";
        PreparedStatement statement = conn.prepareStatement(query);

        statement.setString(1, content);
        statement.setInt(2, likes);

        statement.executeUpdate();
    }

    public static void main(String[] args) {
        Connection conn = null;
        try {
            Class.forName("org.postgresql.Driver");
            conn = DriverManager.getConnection("jdbc:postgresql://localhost:5432/my_database", "temp_user", "temp_password");

            System.out.println("Creating `Post`");
            addPost(conn, "This is my First post by JDBC", 1);
            System.out.println("Successfully Created First `Post`");

        } catch (Exception e) {
            e.printStackTrace();
            System.err.println(e.getClass().getName() + ": " + e.getMessage());
            System.exit(0);
        } finally {
            if (conn != null) {
                try {
                    conn.close();
                } catch (SQLException ex) {
                    ex.printStackTrace();
                }
            }
        }
    }
}
Output:
Creating `Post`
Successfully Created `Post`
Explanation
- Here,
addPost()takesConnectionas the parameter with thecontentandlikesfor a Post. And then add the create a new record with passedcontentandlikesin the post table. - Here, we have used
PreparedStatementinstead ofStatementbecause the Query is dynamic. PreparedStatementis used when the queries are dynamic or queries are reused.- Here, we have used
executeUpdate()method to execute statement. Here, the method should return1(One) which represents the addition of one record. User can check the value by enclosing theexecuteUpdate()line inside theSystem.out.println().
Verification
To verify that the record is added in the table, you should follow these steps:
- First, open psql by the following command:
psql -U temp_user -d my_databaseand then enter the respective password. Then the records can be viewed by the following command
SELECT * from post, and you will get the following output.my_database=> SELECT * from post; id | content | likes ----+-------------------------------+------- 1 | This is my First post by JDBC | 1 (1 row)
Fetching records from the table
Code
package com.personal;

import java.sql.*;

public class Main {
    public static void printAllPosts(Connection conn) throws SQLException {
        final Statement statement = conn.createStatement();
        final String query = "SELECT * FROM post";
        ResultSet result = statement.executeQuery(query);

        while (result.next()) {
            int id = result.getInt("id");
            String content = result.getString("content");
            int likes = result.getInt("likes");
            System.out.printf("Post with Id = %d had content = '%s' with %d likes\n", id, content, likes);
        }
    }

    public static void main(String[] args) {
        Connection conn = null;
        try {
            Class.forName("org.postgresql.Driver");
            conn = DriverManager.getConnection("jdbc:postgresql://localhost:5432/my_database","temp_user", "temp_password");

            System.out.println("Content of table `Post`:");
            printAllPosts(conn);

        } catch (Exception e) {
            e.printStackTrace();
            System.err.println(e.getClass().getName() + ": " + e.getMessage());
            System.exit(0);
        } finally {
            if (conn != null) {
                try {
                    conn.close();
                } catch (SQLException ex) {
                    ex.printStackTrace();
                }
            }
        }
    }
}
Output:
Content of table `Post`:
Post with Id = 1 had content = 'This is my First post by JDBC' with 1 likes
Explanation
- The method
printAllPosts()prints all the posts of the tablepost. - It again uses the
Statementobject to form a query because the required query is static. - Then, it uses
executeQuery()method to execute the Statement and unlikeexecuteUpdate()method, this method returns aResultSetwhich has all the records that are produced by the query. - Initially,
ResultSetwill have a cursor on the first record of the queried data. The Queried record can be fetched by thenext()method ofResultSetwhich moves the cursor to the next record. - The
getInt()andgetString()methods are used to get the Data of a result where the parameter will specify the column for which method is called, and the return value will be the value of the specified column.
Update existing record in the table
Code
package com.personal;

import java.sql.*;

public class Main {
    public static void updateLikes(Connection conn, Integer id, Integer likes) throws SQLException {
        String query = "UPDATE post set likes = ? WHERE id = ?";

        PreparedStatement statement = conn.prepareStatement(query);
        statement.setInt(1, likes);
        statement.setInt(2, id);


        statement.executeUpdate();
    }

    public static void main(String[] args) {
        Connection conn = null;
        try {
            Class.forName("org.postgresql.Driver");
            conn = DriverManager.getConnection("jdbc:postgresql://localhost:5432/my_database", "temp_user", "temp_password");

            System.out.println("Updating Likes for Post with id 1 to 5 likes");
            updateLikes(conn, 1, 5);
            System.out.println("Update Successful");

        } catch (Exception e) {
            e.printStackTrace();
            System.err.println(e.getClass().getName() + ": " + e.getMessage());
            System.exit(0);
        } finally {
            if (conn != null) {
                try {
                    conn.close();
                } catch (SQLException ex) {
                    ex.printStackTrace();
                }
            }
        }
    }
}
Output:
Updating Likes for Post with id 1 to 5 likes
Update Successful
Explanation
- The method
updateLikes()will take theConnectionwith theidof the desired post and new Count oflikesfor that post as parameters. It is used to update thelikesfor the post withidpassed as parameters. - In the implementation,
PreparedStatementis used, since the parametersidandlikeswill get updated with each call. - The
executeUpdate()will execute the Statement and returns the count of the records affected by the query. In this case, the count should be1(One).
Verification
You can verify the above program by the following methods:
- Use the aforementioned
printAllPosts()method and find the post withid= 1 from the output and check whether itslikesgot updated to 1 or not. Can run the following query directly in psql:
SELECT * FROM post WHERE id = 1, and you will get the following output.my_database=> SELECT * FROM post WHERE id = 1; id | content | likes ----+-------------------------------+------- 1 | This is my First post by JDBC | 5 (1 row)
Deleting a record from the table
Code
package com.personal;

import java.sql.*;

public class Main {
    public static void deletePost(Connection conn, Integer id) throws SQLException {

        String query = "DELETE FROM \"post\" WHERE id = ?";

        PreparedStatement statement = conn.prepareStatement(query);
        statement.setInt(1, id);

        statement.executeUpdate();
    }

    public static void main(String[] args) {
        Connection conn = null;
        try {
            Class.forName("org.postgresql.Driver");
            conn = DriverManager.getConnection("jdbc:postgresql://localhost:5432/my_database", "temp_user", "temp_password");

            System.out.println("Deleting Post with id 1 from table `Post`:");
            deletePost(conn, 1);
            System.out.println("Deletion Successful");

        } catch (Exception e) {
            e.printStackTrace();
            System.err.println(e.getClass().getName() + ": " + e.getMessage());
            System.exit(0);
        } finally {
            if (conn != null) {
                try {
                    conn.close();
                } catch (SQLException ex) {
                    ex.printStackTrace();
                }
            }
        }
    }
}
Output:
Deleting Post with id 1 from table `Post`:
Deletion Successful
Explanation
- The
deletePost()method takesConnectionas a parameter with theidof the post for deletion. - This method also uses
PreparedStatementto form a statement and usesexecuteUpdate()to execute the statement. Here,executeUpadate()will return the count of records affected by the execution of the statement and should be equal to1(One).
Verification
User can verify the above program using the following methods
- Can run the above
printAllPost()method to print the Posts, and try to find the Post with Id = 1, if not found then the program worked correctly. Can run the following Query, directly in psql:
SELECT * FROM post WHERE id = 1, and you will get the following output.my_database=> SELECT * FROM post WHERE id = 1; id | content | likes ----+---------+------- (0 rows)
Difference between executeUpdate() and executeQuery()
| executeUpdate() | executeQuery() |
|---|---|
| executeUpdate() is generally used to execute the statement which doesn’t return any column (DML Queries like UPDATE query) | executeQuery() is used when the execution of statements will return one or more records. (SELECT statements) |
| executeUpdate() returns an integer which represents the number of records affected by the executed DML query or in case of other queries it returns 0. | executeQuery() returns the ResultSet which has the records produced by the query and will have the cursor pointing to the first record. |
Difference between Statement and PreparedStatement
| Statement | PreparedStatement |
|---|---|
| The Statement is static, and hence will result in the same query in each execution | PreparedStatement is dynamic and can be modified by the parameters which can be set dynamically. |
| The Statement is generally used for one time. The Statement queries will result in the same query every but the output may vary based on the other queries ran in the middle of the two uses of Statement. | PreparedStatement can be reused any number of times. Whenever parameters are changed, the query will change. This is faster than creating a new Statement every time. |
Features of JDBC
- Portability: JDBC code is highly portable as compared to ODBC.
- Advanced Datatypes Support: Like BLOB, etc.
- Supports Batch Processing: Batch processing aims to reduce Database Visits thus it optimizes the execution time when the Database is stored in a different system than the server and if there is an inherent latency in connection with the Database.
- Supports Savepoints: JDBC supports the savepoints which allow users to roll back the changes done till a particular savepoint.
Key Terms
- Relational Database: Relational Database stores the data in such a way so that it allows information to get accessed or identified by other related information, thus creating a relationship between them. The most common way to structure a Relational Database is through related tables.
- RDBMS: Relational Database Management System is the software that enables users to build and manage a relational database.
- ORDBMS: Object-Relation Database Management System combines the advantages of Object-Oriented Database Models and RDBMS to provide a superior DBMS. It allows the usage of complex data types and types of inheritance.
SQL: Structured Query Language is used to access and manage RDBMS. It is famous for its simplicity, usefulness, and similarity with the English language. It provides functionality to
- Query the stored data (DQL - Data Query Language),
- Define a schema for data (DDL - Data Definition Language),
- Manipulate data (DML - Data Manipulation Language), and
- Control over data (DCL - Data Control Language)
Help us improve this content by editing this page on GitHub